How to Replace a Door Lock (2026): Step-by-Step Guide for Homeowners
Replace a door lock yourself in under an hour: this step-by-step guide covers tools, measurements, deadbolt and knob installation, and testing.

How to Replace a Door Lock (2026): Step-by-Step Guide for Homeowners
The short version: Replacing a door lock is one of the easiest DIY home projects there is. You remove the old knob and deadbolt with a screwdriver, check that the new hardware matches your door’s measurements, install the new latch and bolt, attach the new handles, fit the strike plates, and test everything. Most people finish in 30 to 60 minutes with nothing more than a Phillips screwdriver, a tape measure, and a new lockset. This guide walks you through every step, including the measurements that trip people up.
There are plenty of good reasons to replace a door lock. Maybe you just moved into a new place and have no idea how many copies of the old key are floating around. Maybe the deadbolt sticks every time it rains. Or maybe you are simply tired of looking at a scratched, tarnished knob from the 1990s. Whatever brought you here, the good news is that you almost certainly do not need a locksmith. Modern locksets are designed for homeowners to install, and if your door already has the standard holes cut, the new lock will drop straight in.
Before we pick up a screwdriver, one important distinction: replacing a lock means removing the entire lockset and installing a new one, while rekeying means keeping the existing lock and changing its internal pins so the old key no longer works. Rekeying is cheaper, but replacing gives you new hardware, a fresh finish, and often better security. There is a comparison table further down to help you decide.
Before You Start: Know Your Lock Types
Most exterior doors in the US have two separate locks: a door knob or lever (the handle you turn) and a deadbolt (the separate lock above it, operated by a key or thumb turn). You can replace one or both — many homeowners do both at once so the finishes match and a single key works for everything (look for “keyed alike” sets).
It also helps to know which kind of deadbolt you have:
- Single-cylinder deadbolt: key on the outside, thumb turn on the inside. The most common type for homes.
- Double-cylinder deadbolt: key required on both sides. More secure against someone reaching through a nearby window, but a safety concern in a fire because you need a key to get out. Some local building codes restrict these.
- Keyless/smart deadbolt: keypad, fingerprint, or app-controlled. Installs the same way as a standard deadbolt but needs batteries.
This guide covers the standard replacement — knob/lever plus deadbolt — which accounts for the vast majority of residential front and back doors.
Tools and Materials You’ll Need
You probably own most of this already. Gather everything before you start so the door is never left unsecured longer than necessary.

| Tool / Material | What It’s For | Notes |
|---|---|---|
| New lockset (knob/lever + deadbolt) | The replacement hardware | Buy “keyed alike” so one key fits both |
| Phillips screwdriver | Removing and driving screws | A #2 Phillips fits almost all lock screws |
| Flathead screwdriver | Prying off faceplates | Wrap the tip in tape to avoid scratching |
| Tape measure | Checking backset and bore size | Essential before buying the new lock |
| Pencil | Marking adjustments | — |
| Wood chisel + hammer | Enlarging the strike-plate mortise if needed | Only if the new plates don’t sit flush |
| Silicone-based lubricant | Keeping the mechanism smooth | Avoid oil-based sprays that attract dust |
How to Measure Your Door (Do This Before Buying)
The short version: Measure the bore diameter, the backset, and the door thickness. Match these three numbers and the new lock will fit.
This is the step people skip, and it is the step that causes nearly every installation headache. Take five minutes with a tape measure before you buy anything:
| Measurement | How to Measure | Standard Size |
|---|---|---|
| Bore diameter (the big face hole) | Measure across the hole through the door’s face | 2-1/8 inches |
| Backset | From the door’s edge to the center of the bore hole | 2-3/8″ or 2-3/4″ |
| Door thickness | Measure the edge of the door | 1-3/8″ to 1-3/4″ |
| Cross bore (deadbolt hole) | Same as the knob bore, higher up the door | 2-1/8 inches |
Most modern locksets are adjustable and fit both common backsets (2-3/8″ and 2-3/4″) — the latch simply twists or slides to the setting you need. But if your door is unusually thin, unusually thick, or has non-standard holes, you will want to know before you are standing in the hardware aisle. When in doubt, take the old latch with you to compare.
Step 1: Remove the Old Door Knob or Lever
Start on the interior side of the door — that is where the mounting screws live. You should see two screws on the interior knob or lever plate. Remove them with your Phillips screwdriver and pull the interior handle straight off. The exterior handle will come away with it or can be pulled free from the other side.
Some knobs hide their screws under a decorative rose plate. If you do not see screws, look for a small slot on the neck of the knob: press a flathead screwdriver or pin into it to release the knob from the spindle, then pop the plate off to reveal the screws underneath.
Step 2: Remove the Old Deadbolt
The deadbolt comes out the same way. On the interior side, remove the two screws holding the thumb-turn assembly to the door, then pull both halves apart. Next, remove the two screws on the door’s edge that hold the bolt mechanism in place, and slide the bolt out of the edge bore.
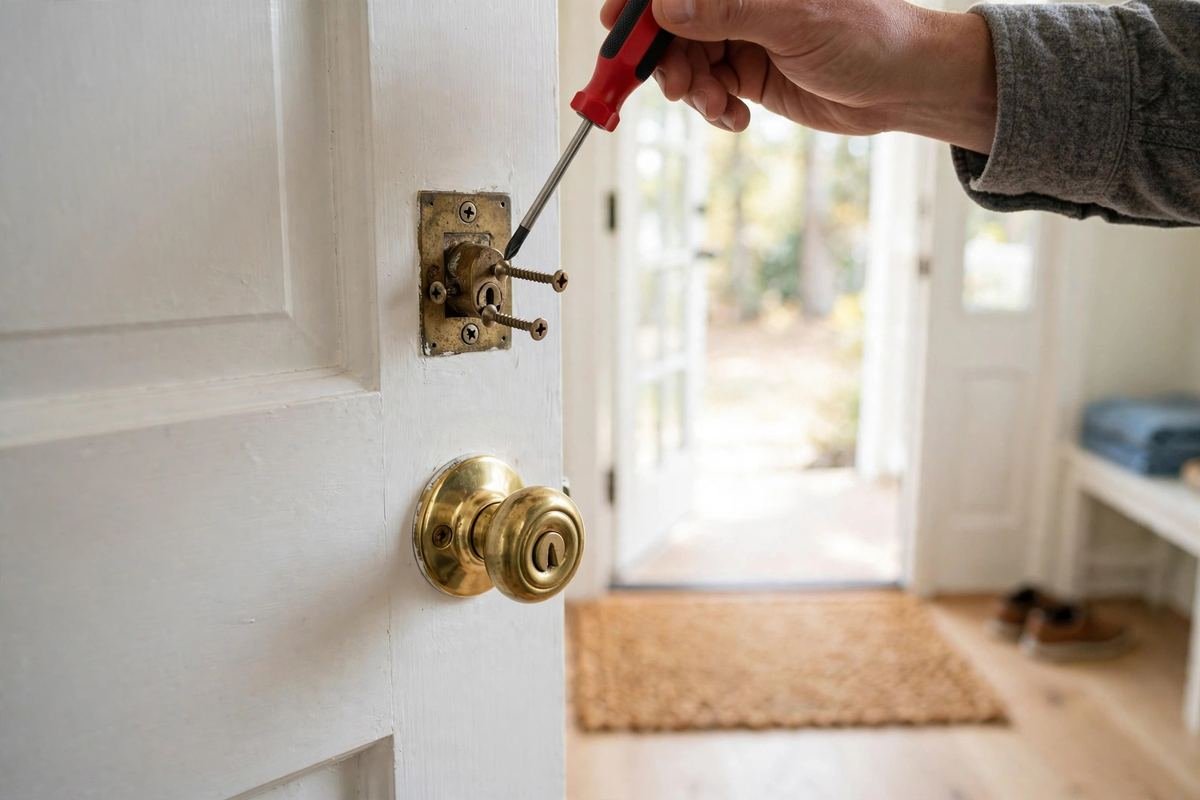
Tip: Keep one hand on the exterior half of each lock as you remove the interior screws, so nothing drops and scratches the door — or your floor.
Step 3: Take Out the Latch and Strike Plates
With the handles and deadbolt removed, unscrew the latch plate (on the door’s edge, where the knob’s bolt sits) and pull the old latch mechanism out of the door. Then move to the door frame: unscrew the strike plates — the metal plates the bolts slide into when the door closes — and set them aside. Keep the old screws in a cup or tray; you will not reuse them, but it keeps things tidy.
Step 4: Check the Fit of the New Hardware
The short version: Test-fit everything before driving a single screw. It is much easier to adjust now than later.
Slide the new latch into the edge bore and the new deadbolt bolt into its bore. They should slide in snugly without forcing. Check that the bore holes line up with the new hardware and that the latch’s backset matches your door (most latches adjust between 2-3/8″ and 2-3/4″ — set it to your measurement now).
Hold the new strike plates up to the door frame. If the new plates are larger than the old mortises (the shallow recesses cut into the wood), you will need to enlarge them with a wood chisel — take off a little at a time and test-fit often. If the holes are too small for the new bolts, a hole saw can enlarge them, but this is uncommon with standard doors.
Step 5: Install the New Latch and Deadbolt Bolt
Insert the new latch mechanism into the edge of the door. The beveled (angled) face of the latch bolt must point toward the direction the door closes — toward the strike plate. This is the single most common installation mistake: if the bevel faces the wrong way, the door will not latch shut.
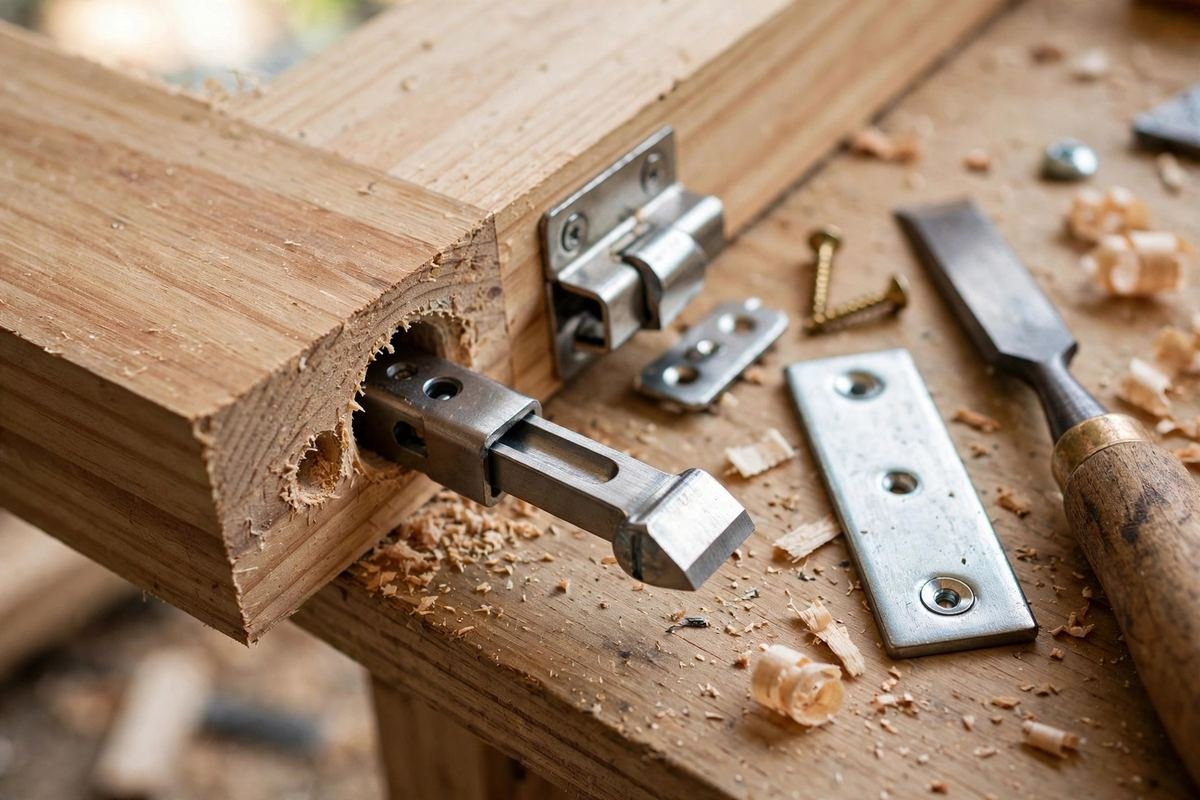
Secure the latch with the screws provided, making sure the faceplate sits flush with the door’s edge. Repeat with the deadbolt bolt in the upper bore: slide it in, align it, and fasten it with its screws. The bolt should extend and retract smoothly when you push it by hand.
Step 6: Attach the New Knob and Deadbolt
Now the visible parts. For the knob or lever:
- Push the exterior handle through the bore from outside, feeding its spindle through the slot in the latch mechanism.
- From the interior side, align the interior handle with the spindle and the two mounting screws.
- Drive the long mounting screws through the interior plate into the exterior assembly. Tighten firmly but do not overtighten — you can crack decorative plates or bind the mechanism.
For the deadbolt:
- Place the exterior half (the key cylinder) into the bore from outside, making sure its tailpiece slides into the bolt mechanism.
- Some sets include an interior mounting plate — position it over the bore from inside.
- Guide the screws through from the interior side and tighten. The thumb turn should rotate the bolt smoothly.
- Snap on any decorative cover plates.
Step 7: Install the Strike Plates
Screw the new strike plates onto the door frame where the old ones were. Use the long screws that come with the set — and if the kit includes extra-long 3-inch screws, use them for the deadbolt strike plate. Long screws bite into the wall stud behind the frame rather than just the trim, which makes the lock dramatically harder to kick in. This is a small detail with an outsized effect on security.
Step 8: Test Everything Before You Call It Done
With the door open, test every function first:
- Turn the knob/lever — the latch should retract fully and spring back crisply.
- Turn the deadbolt key and thumb turn — the bolt should extend and retract smoothly, with no grinding.
- Lock and unlock from both sides with the key you were given.
Now close the door and test again. The latch should catch the strike plate cleanly, and the deadbolt should slide into its strike without you having to push or lift the door. If the deadbolt drags, the strike plate is slightly misaligned — loosen its screws, nudge it, and retighten. If the bolt hole in the frame is too shallow, remove the plate and chisel the mortise a fraction deeper.
For more home improvement guidance written for homeowners, the practical guides at Home Water Insights cover everything from plumbing fixes to water quality, and A Daily Insight360 publishes useful how-to content across home and lifestyle topics.
Deadbolt vs. Door Knob Locks: What’s the Difference?
If you are wondering why doors have two locks at all, here is the breakdown:
| Feature | Door Knob / Lever Lock | Deadbolt |
|---|---|---|
| How it locks | Spring-loaded latch, retracted by turning the handle | Solid bolt, extended by key or thumb turn |
| Security level | Basic — latches can be forced or slipped with a card | High — resists kicking, prying and picking far better |
| Best for | Interior doors, closets | Exterior doors — always pair with a knob |
| Convenience | Quick, one-handed | Requires a deliberate lock/unlock action |
| Cost | Lower | Moderate |
The takeaway: a knob lock alone is not enough for an exterior door. The deadbolt does the real security work; the knob is mostly a handle that happens to latch.
Rekeying vs. Replacing: Which Should You Choose?
| Factor | Rekeying | Replacing |
|---|---|---|
| Cost | Cheaper (a rekeying kit or locksmith visit) | Higher (new hardware) |
| DIY difficulty | Moderate — fiddly pin work | Easy — mostly unscrewing and screwing |
| Appearance | Unchanged | Fresh finish and style |
Common Mistakes to Avoid
- Installing the latch bevel backwards. The angled face must point toward the strike plate (the direction the door closes). Get this wrong and the door won’t latch.
- Skipping the measurements. A lockset with the wrong backset simply will not fit. Measure first, buy second.
- Overtightening screws. Snug is enough. Overtightened screws can warp plates and bind the mechanism.
- Reusing old strike plates. New plates are sized for the new bolts, and the long screws they come with meaningfully improve kick-in resistance.
- Testing only with the door open. Always test with the door closed too — alignment issues only show up then.
- Throwing away the spare keys before testing. Test every key in the set before you stash the spares.
How to Maintain Your New Locks
A new lock should last for many years with minimal attention. Once or twice a year, spray a silicone-based lubricant into the keyway and work the key in and out a few times. Avoid oil-based products, which attract dust and eventually gum up the pins. Check the strike-plate screws annually — houses settle, doors shift, and a quick tightening keeps everything aligned. And if a key ever starts sticking, address it early: a sticky lock is a wearing lock.
FAQs
How long does it take to replace a door lock?
For a standard replacement where the new hardware matches the existing holes, most people finish in 30 to 60 minutes. Your first one takes longer; the second one takes about 20 minutes.
Do I need a locksmith to replace a door lock?
No. Replacing a standard knob and deadbolt is a beginner-level DIY project. You only need a locksmith for unusual situations — high-security locks, doors without existing holes, or if you want the lock rekeyed rather than replaced.
Can I replace just the deadbolt and keep the old knob?
Yes. Each lock installs independently. Many people replace both at once for matching finishes and a single key, but there is no requirement to do them together.
What does “keyed alike” mean?
It means multiple locks are pinned to work with the same key. When buying a knob-and-deadbolt combo set, “keyed alike” lets one key operate both — much more convenient than carrying two keys.
My new deadbolt sticks when I turn the key. What went wrong?
Almost always a strike-plate alignment issue. With the door closed, watch where the bolt meets the plate — it is probably dragging on one edge. Loosen the plate screws, shift the plate slightly, and retighten. A small misalignment makes a big difference.
Should I replace my locks when I move into a new home?
Yes — security professionals consistently recommend it. You cannot know how many copies of the old keys exist or who holds them. Replacing (or at minimum rekeying) every exterior lock is one of the first things to do in a new home.
Read Also: Joel Edgerton (2026): Complete Guide to the Actor’s Latest News and Projects
Related Stories

How to Buy a House in 2026: A Step-by-Step Guide for First-Time Buyers
How to Buy a House: The Real Step-by-Step Guide for 2026 Nobody sits you down in school and…
1 response